The jaw carrier alignment procedure ensures that the front and rear jaw bodies are equidistant from the machine front plate when the horizontal sealing jaws close. Proper carrier alignment helps to ensure equal pressure distribute between the sealing surfaces—thus maintaining a high seal quality.
The jaw carrier alignment is a two-part process. The first part involves aligning the shafts (draw bars) that drive the rear jaw assembly. The second part involves positioning the front jaw assembly on its draw bars. Once both parts of the procedure are complete, the sealing jaws will meet at the center of the forming tube when they close and apply even pressure across the sealing surfaces.
Jaw Carrier Alignment Procedures- Rear Jaw
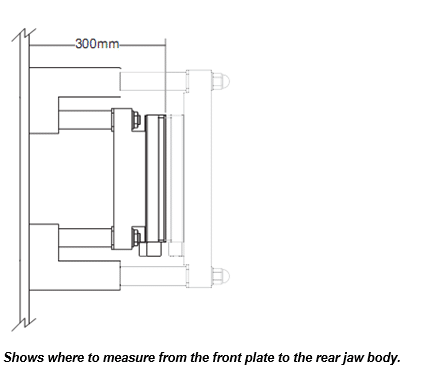
The rear carrier shaft alignment procedure positions the draw bars that drive the rear jaw assembly so that they extend the same distance through the machine front plate. Once the shafts are positioned, the front face of the rear jaw body will be 300mm away from the machine front plate—which centers it under the forming tube.
Use the following procedure to align the rear carrier shafts.
To align the rear carrier shafts:
1. Check that the bag maker J is properly locked-out and tagged-out.
2. Remove the front jaw assembly; otherwise you may not be able to install the alignment plate if the shafts are severely out of alignment.
3. Manually push the jaws into the closed position.
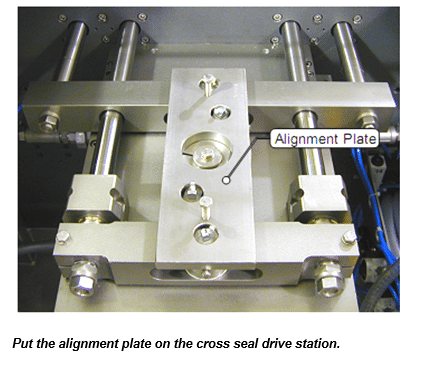
4. Place the alignment plate on the cross seal drive station as shown. Note: The two bolts extending from the plate are used to remove it after its use.
Jaw Carrier Alignment Procedures
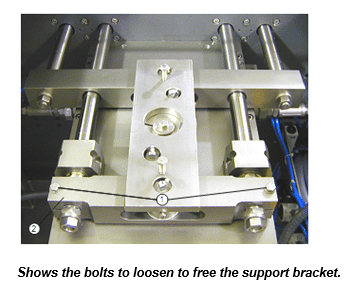
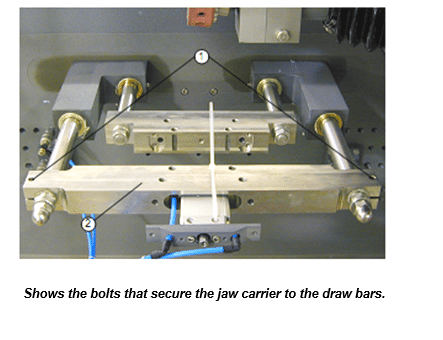
5. Loosen the two bolts (item 1) that clamp the support bracket (item 2) to the draw bars.
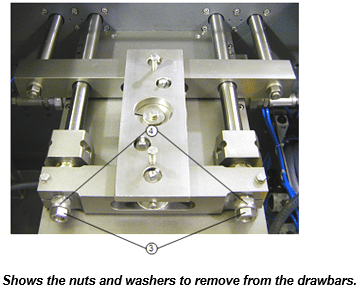
6. Remove the two nuts and the two washers (item 3 & 4) that secure the support bracket to the draw bars.
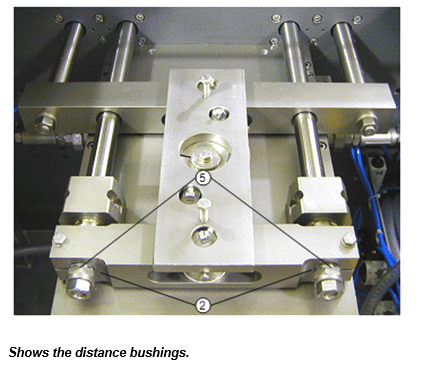
7. Turn the distance bushings (item 5) until they are flush with the surface of the support bracket (item 2);
this extends the shafts the same distance through the machine front plate.
8. Turn the distance bushings (back them out) an equal amount until the front of the rear jaw body is
300mm away from the front plate. You may need to make small adjustments and take frequent
measurements.
9. Clamp the bracket into position by tightening the two bolts (item 1, Figure 7.13).
10. Secure the support bracket in this position with the two nuts and washers (items 3 & 4, Figure 7.14).
Jaw Carrier Alignment Procedure -Front Jaw
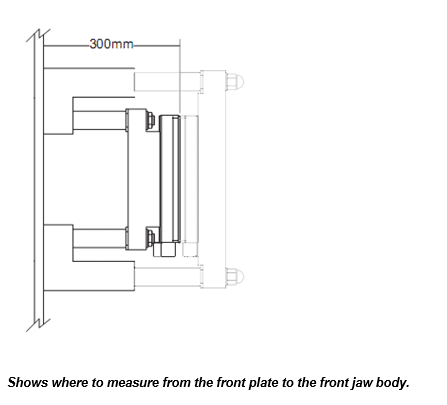
Positioning the front jaw assembly ensures that when the horizontal sealing jaws close, the face of the front jaw body is 300mm away from the machine front plate. This places it against the rear jaw body, and at this point in the sealing cycle, the cross seal drive would press the jaw bodies together to create sealing pressure.
Use the following procedure to position the front jaw assembly. At this point, the bag maker should still be locked-out and tagged-out, and, the alignment plate should still be installed on the cross seal drive station.
To position the front jaw assembly:
1. Place the front jaw assembly back on its draw bars. Leave the two bolts (item 1) that clamp the front jaw carrier (item 2) to the draw bars loose.
2. Remove the two dome nuts and the two washers (items 3 & 4) that secure the front carrier to the draw
bars.

3. Turn the distance bushings (item 5) until they are flush with the surface of the carrier (item 6).
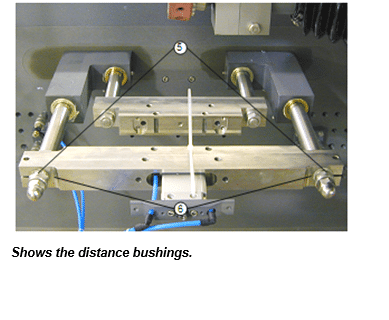
4. Turn the distance bushings (back them out) an equal amount until the front of the front jaw body is
300mm away from the front plate. You may need to make small adjustments and take frequent
measurements.
5. Clamp the carrier to the draw bars with the two bolts.
6. Secure the carrier in this position with the two nuts and washers.
------------------------------------------------------------------------
More Rovema Support Options
See Additional Mechanical Issues
Looking for a manual for you Vertical Form Fill and Seal (VFFS) Bagger? Click here!