Establishing the Horizontal Seal
Setting the Film Registration System
After you have established the horizontal and vertical seals, you can setup the film registration system. The system allows you to change the cutting and sealing location.
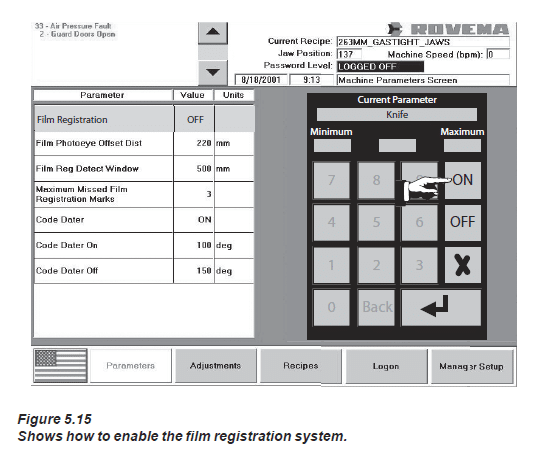
Before starting this procedure, enable the film registration system by setting the Film Registration parameter (on the Photoeye/Code Dater screen) to ON.
Positioning the Photoeye The first step in setting up the registration system is to determine which film markings you will use for film registration. The marks must appear at regular bag length intervals and must be much lighter or darker than the rest of the film so that they are detectable.
Once you have determined which set of marks to use, you must position the lens of the registration sensor in the path of these marks.
To position the sensor, use the PHOTOEYE POSITION buttons on the Adjustments screen to move the lens of the photoeye in-line with the registration field.
Note: You may need to adjust the sensitivity of the sensor to detect the registration marks. The photoeye specifications sheet in your Electrical Documentation will explain how to adjust the sensor.
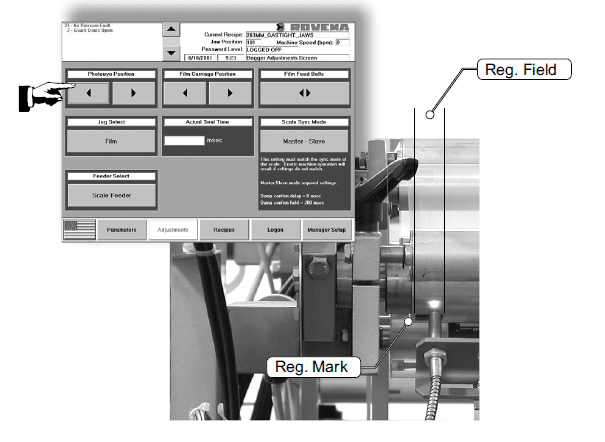
Figure 5.16
Shows how to position the film registration photoeye.
Determining the Film Reg. Detect Window Value If there are marks in the registration field besides the registration marks, then you will need to set a detection window. The detection window tells the bagmaker when to look for a mark during the forming cycle; which is just after all other marks have past the sensor. Use the following procedure to determine the detection window value.
To determine the detection window value:
1. Examine a section of film and locate the desired registration mark.
2. Locate the mark (false mark) that is closest to the registration mark.
3. Measure the distance between the false mark and the registration mark.
4. From the Parameters screen, press the Photoeye/Code Dater button to display the Photoeye/Code
Dater screen.
5. From the Photoeye/Code Dater screen, press the Film Reg. Detect Window parameter; a keypad will
appear.
6. Divide the value measured in step 3 by two (2).
7. Use the keypad to enter the value calculated in step 6 (in millimeters) then press the ENTER key to set
the value.
Determining the Film Reg. Detect Window Value
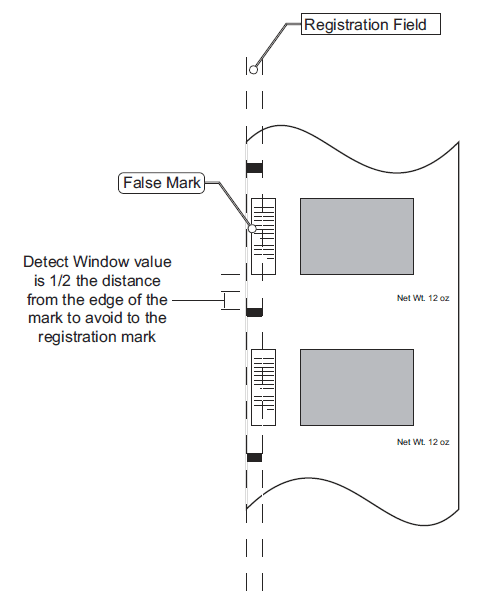
figure 5.17
Shows how to determine the film registration detection window.

Establishing the Horizontal Seal
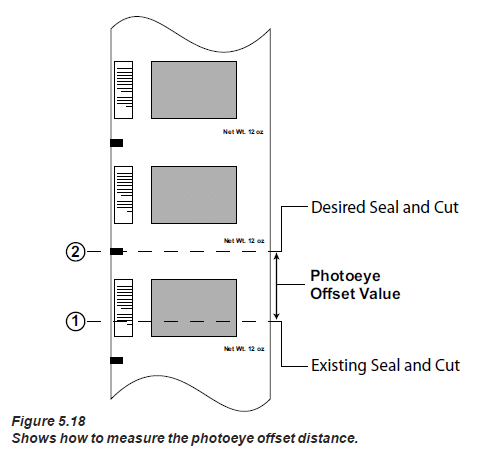
Determining the Photoeye Offset Distance Parameter The bagmaker times the rotation of the horizontal sealing jaws so that they close (land) on the film tube as a registration mark passes the registration sensor. You can change where the jaws land on the film tube by making the bagmaker advance more film before the jaws close. You tell the bagmaker how much additional film to advance through the photoeye offset distance parameter.
Use the following procedure to determine the photoeye offset distance parameter. Before you run the machine, check that the cutting knife is disabled so that the machine produces a continuous string of bags, and, check that the photoeye offset distance parameter is set to zero (0).
To determine the photoeye offset distance parameter:
1. From the operator control panel, set the JOG/AUTO selector switch to the AUTO position.
2. From the operator control panel, press the MACHINE READY push button. The push-button should
light up and stay lit.
3. From the operator control panel, press the JOG/RUN push-button to begin automatic bag forming.
Let the machine run for a few forming cycles to get a continuous string of bags.
4. From the operator control panel, press the STOP push-button to stop automatic bag forming.
Establishing the Horizontal Seal
Determining the Photoeye Offset Distance Parameter
5. Examine the string of bags and notice where the bagmaker is sealing the film.
6. Measure the distance from the actual sealing location up to the desired sealing location.
7. From the touchscreen display, press the Parameters button to display the Parameters screen.
8. From the Parameters screen, press the Photoeye/Code Dater button to display the Photoeye/Code
Dater screen.
9. From the Photoeye/Code Dater screen, press the Film Photoeye Offset Dist. button; a keypad will
appear.
10. Use the keypad to enter the distance measure in step 6 (in millimeters) and then press the ENTER key
to set the value.
11. Repeat steps 1 through 6 until the bagmaker is seal at the desired location.
------------------------------------------------------------------------
More Rovema Support Options
See Additional Operation Articles
Looking for a manual for your Vertical Form Fill and Seal (VFFS) Bagger? Click here!