Table of Contents
SECTION 1: HORIZONTAL SEALING JAW PROCEDURES.................................1-1
HORIZONTAL SEALING DEVICE .......................................................................................1-1
HORIZONTAL SEALING DEVICE - OPTIONS ....................................................................1-2
HORIZONTAL SEALING JAWS ............................................................................................1-3
HORIZONTAL SEALING JAWS ALIGNMENT......................................................................1-7
Checking the alignment of the horizontal sealing jaws...........................................................1-7
SEAL PRESSURE ADJUSTMENT ..........................................................................................1-9
Section 1: Horizontal Sealing Jaw Procedures
These procedures should only be completed by technicians trained by Rovema and follow industry, local, state and federal safety guidelines.
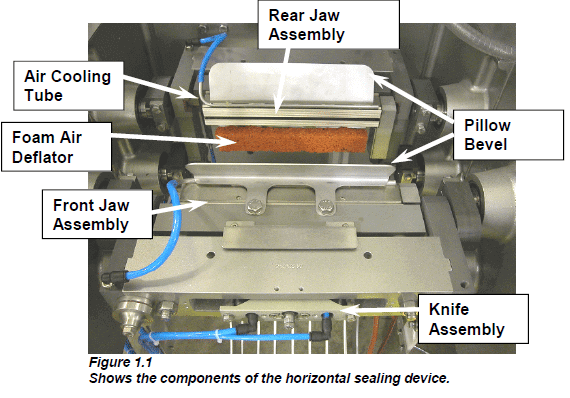
The machine should be LOCKED OUT and TAGGED OUT before performing maintenance operations! The horizontal sealing device creates the top and bottom seals in a bag and cuts the bag from the film tube. Top and bottom seals (horizontal seals) are created in the same manner as the vertical seal; by applying heat and pressure for a certain amount of time. The heat and pressure are created by the sealing jaws. The time is controlled by the speed of the drive system.
The horizontal sealing device consists of a front and rear jaw assembly, a drive system, and a knife assembly. Controls for the device are accessed through the touchscreen display and from the temperature controllers (all located on the bag maker control panel).
Danger: Wear protective gloves and verify that the jaws are cool when working in this area. The Sealing Jaws become very hot!
Danger: The knife is very sharp and may cut the operator. Wear gloves and use proper tools while working on (or near) the knife assembly.
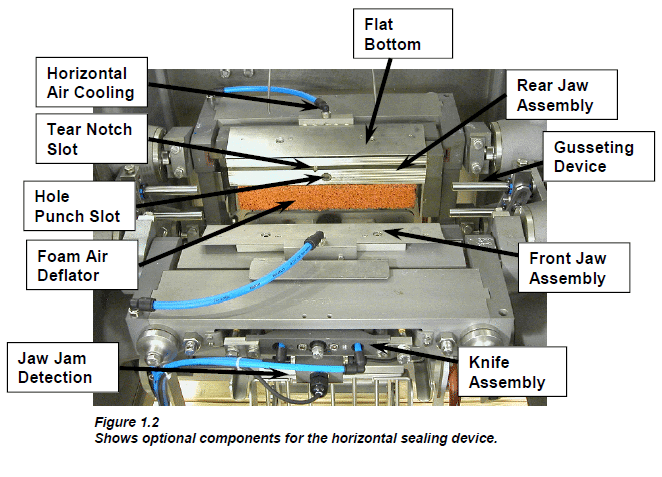
Horizontal Sealing Device - Options
Horizontal Sealing Jaws
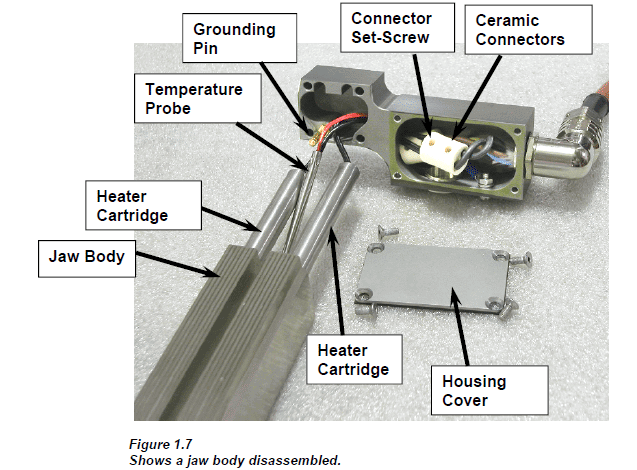
At some point, the heating cartridges and the temperature probes inside of the horizontal sealing jaws must be replaced. Use the following procedure to replace the heating cartridges and the temperature probe in the front jaw assembly. The same procedure can be applied to replace the heating cartridges and the temperature probe in the rear jaw assembly. Before starting this procedure, make sure that the bag maker is locked-out and that the sealing jaws have cooled.
Note: It is not necessary to remove the c-frames from the machine to perform this procedure. They have been removed in the illustrations for clarity.
To replace the heater cartridges and the temperature probes:
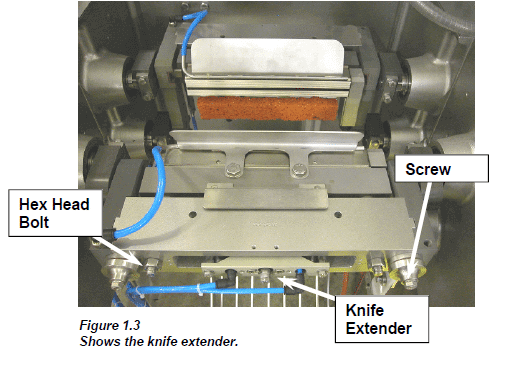
1. Push the knife extender inward to extend the cutting knife.
2. Locate the knife securing screw under the front jaw body.
3. Loosen the screw until the slotted knife can be removed from between the jaws.
4. Use a pair of pliers to remove the knife blade.
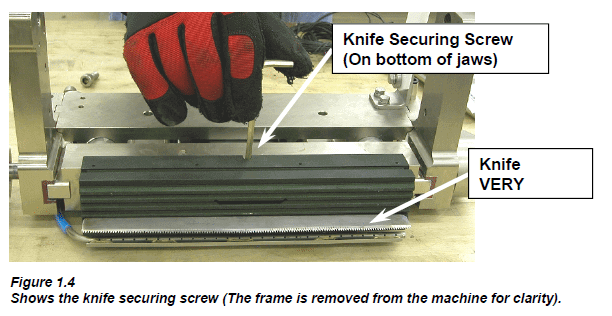
Use a pair of pliers or wear appropriate gloves to remove the knife blade.
5. Remove the two hex head bolts that secure the knife assembly to the C-frame.
6. Remove the two socket head cap screws that hold the jaw carrier in the C-frame.
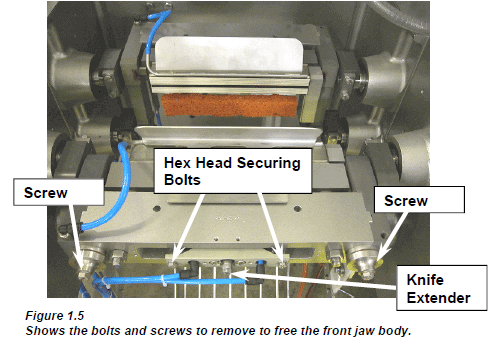
7. Remove the knife air cylinder from the C-frame.
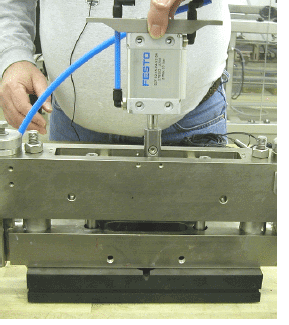
8. Remove the jaw body and its carrier from the C-frame.
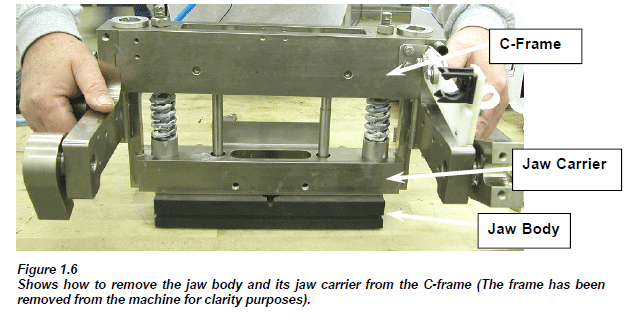
Replacing Heater Cartridges and Temp Probes
9. Remove the terminal housing from the jaw body.
10.Remove the terminal housing cover to expose the ceramic connectors.
11.Disconnect the heating cartridges and the temperature probe from the ceramic connectors.
12.Remove the heating cartridges and the temperature probe from the jaw body.
13.Install the new heating cartridges and the new temperature probe in the jaw body.
14.Connect the heating cartridges and the temperature probe to the ceramic connectors.
15.Assemble and install the front jaw assembly into its C-frame.
Horizontal Sealing Jaws Alignment
Checking the alignment of the horizontal sealing jaws.
There are two types of paper that may be used for the Paper Alignment Test (Type A or B, as described below).
Type A Paper: Pencil Carbon Paper is used on jaws at room temperature.
Type B Paper: TP Paper (Temperature-Pressure) is used on hot jaws (approximately 200-300F). The acceptable temperature is specified by the manufacture of the paper.
1. Obtain the paper (Carbon Paper or TP Paper) and tape.
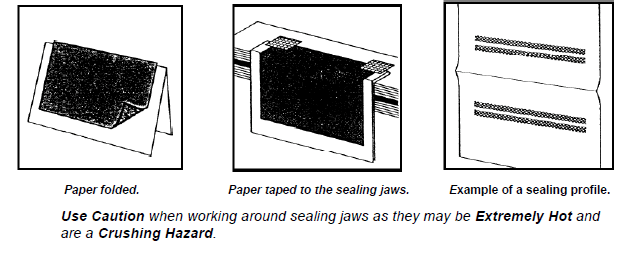
2. If using carbon paper, place the coated side of carbon paper on the white paper and fold it, as shown
below. If using TP Paper, a white piece of paper is not required.
3. Place the paper between the sealing jaws and fasten them to the front jaw using tape. As shown below.
4. Close the protective doors.
5. Access the JOG MENU on the HMI of the machine and close the horizontal jaws in the jogging mode.
6. Open the horizontal jaws, open the protective doors, lift off the paper and inspect the profile prints on
the paper.
7. If adjustments are required, refer to the following instructions.
Adjusting the Jaw Pressure Distribution
Note: If satisfactory results were not obtained on the paper alignment test, carbon paper on room temperature jaws or TP Paper on hot (200-300 F) jaws, adjust the pressure distribution by following these procedures.
1. Close the horizontal jaws until they are touching each other. (Between 330and 340, refer to the
actual position on the touch screen.)
2. Loosen the two securing bolts in the rear of the rear jaw carrier. (The front jaw assembly is not
adjusted.)
3. To obtain equal pressure distribution, tighten or loosen the adjusting screws, as required, per the
results from the paper test. (See possible examples below)
4. To increase the pressure, turn the adjusting screws clockwise. To decrease the pressure, turn the
adjusting screws counterclockwise.
5. Tighten the two securing bolts, after the adjustments are complete.

Seal Pressure Adjustment
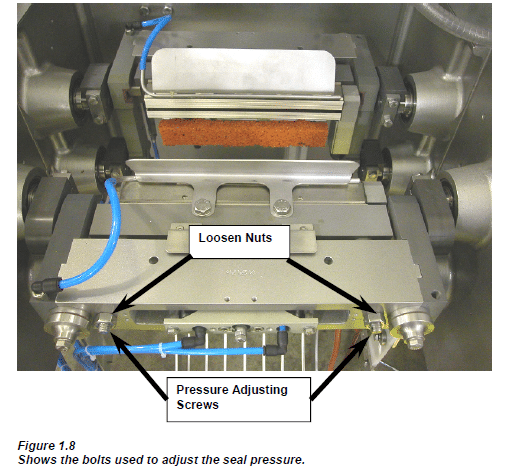
To adjust the Seal Pressure:
1. Run the jaws in Jog Mode until the bolts and nuts are accessible.
2. Loosen the outer lock nuts.
3. Turn the pressure regulating screws with a fork wrench and a pin driver.
4. To increase the pressure, turn the adjusting screws clockwise.
5. To decrease the pressure, turn the adjusting screws counterclockwise.
6. Retighten the locking nuts and perform the carbon paper test again. Repeat if necessary.
------------------------------------------------------------------------
More Rovema Support Options
See Additional Mechanical Articles
Looking for a manual for your Vertical Form Fill and Seal (VFFS) Bagger? Click here!